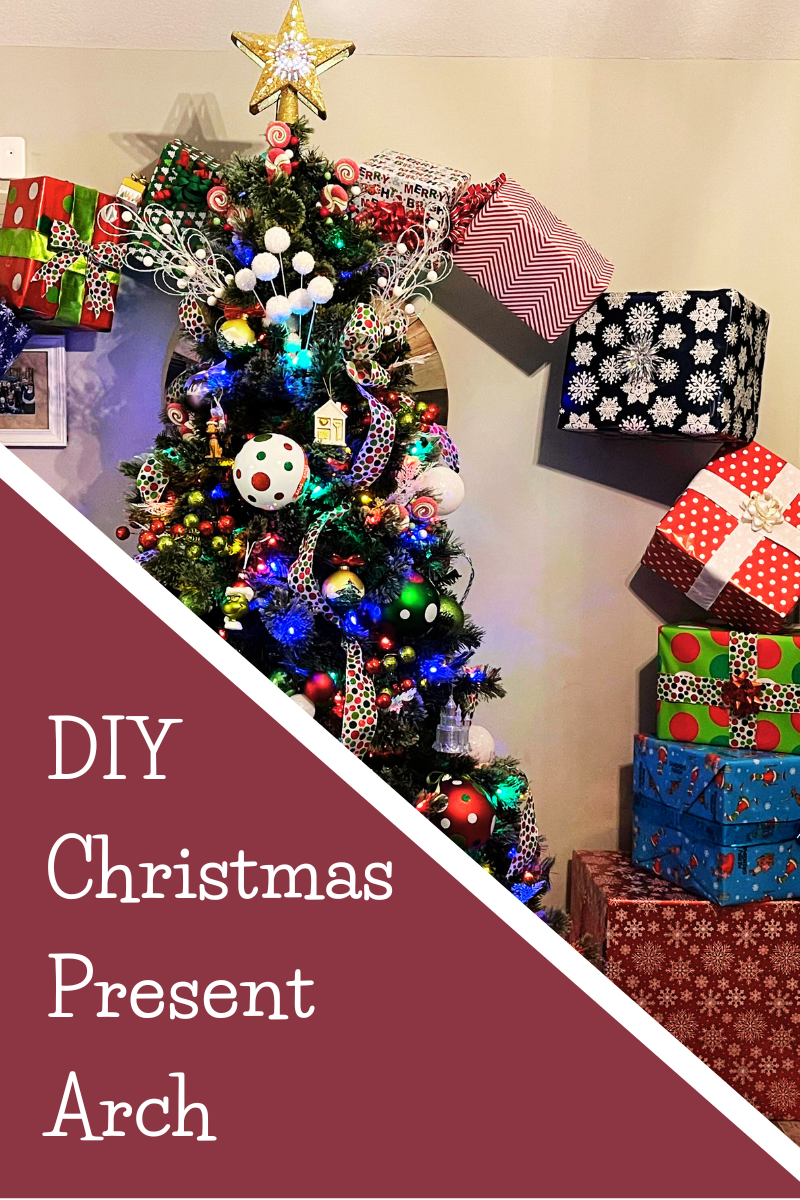
Recently, Keith and I decided to create our own, simplified variation of the Hallmark DIY Christmas Present Arch. Although a bit time-consuming, it’s easier than you may think to create your own Christmas Present Arch! Honestly, it took more time to wrap all the empty boxes than it did to build the arch itself.
Materials to Create Your Own DIY Christmas Present Arch
- 3/4 inch PVC pipes (the number and length depend upon the height, width, and length of the arch you’re creating). I looked for these on Amazon, but I was only able to find them in bulk. We purchased six 5-foot pipes, from a local hardware store, and have two left over.
- A PVC Pipe Cutter
- Four 45 degree elbows
- Two three-way PVC “tee” connectors -or- two five way PVC connectors for the base. (Hallmark recommends making a base with a board, but we found this base much easier to make. We used two three-way PVC connectors.)
- Measuring tape
- Hallmark recommends gorilla glue to secure the pipes within the fixtures, but we didn’t use it. We found that it’s secure without it, and we want to be able to easily take it apart and number the pieces so that we can set it up again next year.
- Empty cardboard boxes (waxed for outdoors)
- Wrapping paper (vinyl for outdoors)
- Command hooks (We used 2.)
- Zip ties (We used 2.)
Our Process for Creating the DIY Christmas Present Arch
We began by measuring our space. The DIY Christmas Present Arch is meant to adorn doorways, but all of our doorways are in corners or close to a closet or something that made this impossible. So, Keith came up with the idea of making it around/behind our Christmas tree, so we assembled our Christmas tree as a part of the measuring process.
To Create the Base
Keith used a three-way “tee” PVC connector. He wanted to use a five-way connector to make it even more stable, but our local store didn’t have any in stock. (But you can buy five way PVC connectors from Amazon.)
He cut a five foot PVC pipe into fourths and connected a fourth of the pipe to “tee” part of the three way to create “legs.” Then we added an uncut 5-foot PVC pipe to create the first stand of our arch. We repeated the process for the other side. Then, we began adding our wrapped presents.
The first three presents that we added on each side of our arch are stacked as normal. We used a large moving box, a medium moving box, and a small moving box on each side to give the arch a sense of symmetry. I wrapped each set in the same paper, which I feel adds to the sense of symmetry. The rest of the arch is anything but symmetrical. You’re going to want to put the holes for the rest of your boxes at different angles. Just play around with it to see how they will look.
Creating the Arch
After creating both bases and adding your wrapped Christmas presents, you’re going to add a 45-degree elbow to each side of arch. You may have to cut your PVC pipe section, depending on the area you have to work with, but then you’ll add your next pipe section and keep making holes in the gifts and adding presents.
For our arch, we added two more 45-degree PVC Connectors and one more section of pipe, cut to fit the remaining space. Keith carefully measured this section to make sure the arch was exactly the width we needed it to be.
This time, we added the presents to the arch, both of us got on step ladders and we fitted the ends of our pipe into the 45-degree PVC connectors to complete the arch.
Securing Your DIY Christmas Present Arch
To be completely honest, the arch seems fairly secure without this step, but we wanted to add extra security. After all of this hard work, the last thing we wanted was for our DIY Christmas Present Arch to fall over on our tree or on a guest.
To secure to arch, Keith used two command hooks and two zip ties. He placed a command hook just behind the topmost 45-degree elbows on each side of the arch. Then, he used a zip-tie to secure the arch to the wall. This method has secured our arch to the wall in a wall that will be both easy to remove and not damage our wall in any way.


Meet Robin and Keith – Read our “About” page.
